How to Turn Your Hand Drawn Art into Beautiful Vectors
What You'll Need
- Computer (Duh!)
- Scanner - I use a Canon CanoScan LiDE120. This scanner works really well and is fairly cheap (About $50 - $65) depending on where you buy it on the web. You can also use a typical all-in-one desktop printer scanner. The key here is being able to scan in at a high DPI.
- Paper and Pencil (Of course!)
- Eraser - Any will do, but I absolutely LOVE peel-off magic rub erasers. I like them because they can be used as a drawing tool, but also give you better control over erasing (vs. blocky erasers). They are a little pricey, but last a fairly long time and are worth it!
- Transparency Paper
- Masking Tape - To hold down your transparency paper
- Fine-tip Markers - In this demonstration I use both Micron and Faber Castell fine-tip markers. Use whatever brand you are comfortable with. I recommend using an assortment of pen sizes (Larger sizes for filling in shapes and smaller sizes for finer details).
- Adobe Illustrator - For those of you on a budget you can use Inkscape (Open Source Free Software) as an alternative.
- Adobe Photoshop - For those of you on a budget you can also use GIMP (Open Source Free Software) as an alternative.
Step 1: Create Your Drawing
Create any drawing your heart desires :)
If you follow me on Instagram you'll find my peacock sketch familiar. I thought it'd be a great example for this. You'll also see some of my notes on my sketches. Sometimes I like to plan out what colors I'm going to use for certain shapes.
Peacock sketch with typography - Lauren Hodges
My arsenal of drawing supplies
Step 2: Refine and Outline
First I cut out a small section of transparency paper and use the masking tape to secure the transparency paper. This keeps it from shifting around when tracing. I then use my fine-tip markers to outline and fill in my shapes. Tracing my drawing with fine-tip markers is going to give me a nice dark/crisp drawing that'll scan in nicely and catch all those fine rough details I want. This also gives you the chance to exclude or make changes to your final outline. In my example below, I decided to leave out the phrase and use the word 'Peacock' alone. I was also able to fix the base of the tail. In my original sketch it was too high and I shifted it down slightly.
Transparency paper secured and ready for tracing.
Finished traced drawing ready to be scanned.
Step 3: Scan in Your Drawing
I've provided the settings I have for my scan as a reference below. For this purpose, I'll scan in my drawing in grays. There's no need for us to scan our drawings in as a color scan as you'll only need it in black and white when you turn it into a vector. The big thing is to make sure you scan your drawing in at 600 dpi or higher.
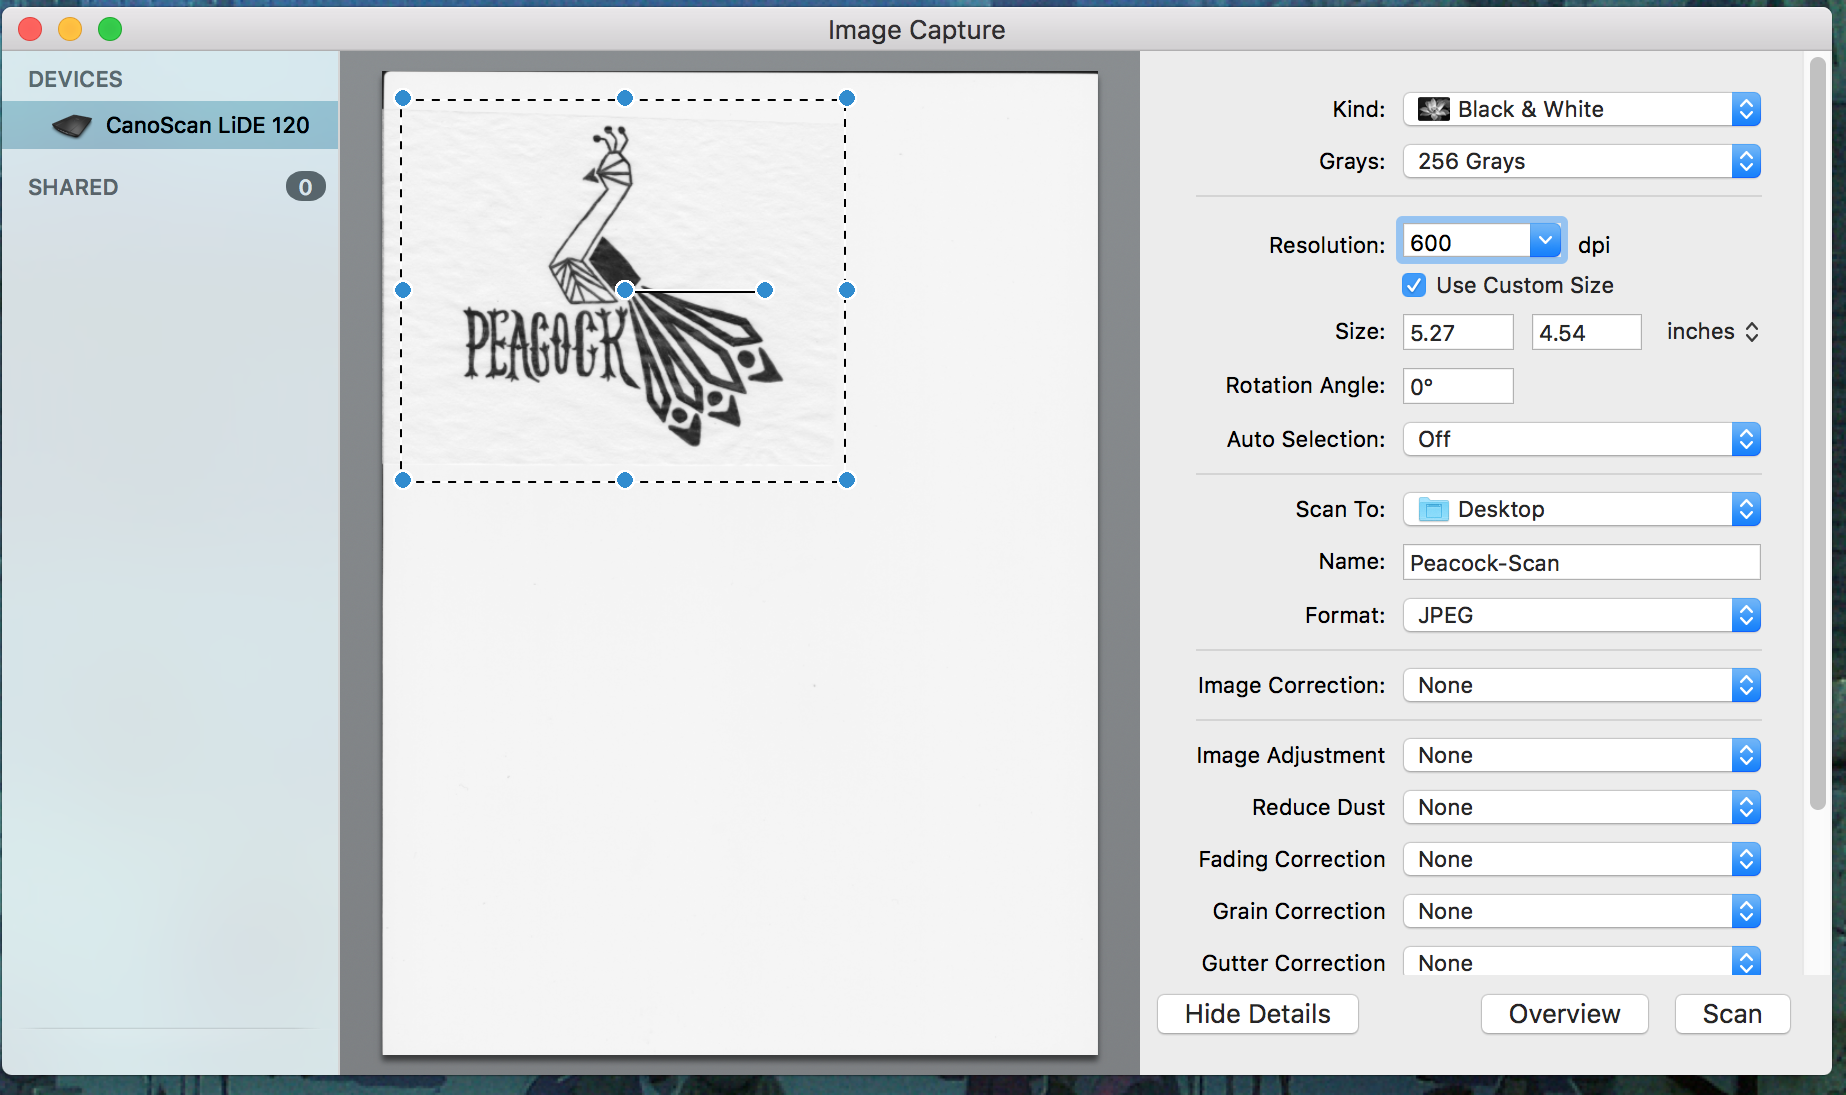
My scanner settings
Step 4: Edit Your Sketch in Photoshop
Open your sketch in Photoshop (or GIMP). For this demonstration I'll be using Photoshop. You can find how to adjust levels in GIMP here. We'll be adjusting the levels (Brightening up the whites and darkening the darks) to get a nice rich contrast. I've attached a screenshot below to show where this is accessed in Photoshop. Each drawing will vary. You'll want to adjust your levels to what looks best. Clean up any specks on the main image layer with the spot healing brush tool.
Level Adjustments in Photoshop and spot healing brush tool location

Scan before Photoshop edit

Scan after Photoshop adjustments
Step 5: Vectorize
Next we are going to trace our image in Illustrator (or Inkscape). For this demonstration I'll be using Illustrator. You can find how to adjust tracing thresholds in Inkscape here. Select your image and then select the 'Image Trace' button at the top of the screen. Next select the 'Image Trace panel button to the left of that. On this panel we are going to adjust some of the settings in order to get a nice vector trace without losing all those beautiful hand drawn rough edges. Make adjustments to the threshold, paths, corners, and noise until you are satisfied with your vector. Make sure the 'preview' is checked in the panel or you won't see any of the changes. You can see my adjustments in the second image below. Once you are happy, finalize your vector by clicking on the 'expand' button. Voila!
Select your image and click on the image trace button
Image Trace panel button location and my adjustments
Step 6: Finalize
Now we have a workable vector. First lets ungroup everything so that we can work with each individual shape a little better (Select your artwork > Object > Ungroup). Once you've ungrouped your shapes, start coloring! If you need help finding a color palette to work with you can save color palettes on Adobe Color CC. You can also fill in your shapes by creating new ones (like I did on the peacock's neck) by using the hotkey 'Shift + M'. Then draw through the shapes you want to connect/create. There you have it! You now have a finished vector you can scale to any size without losing any quality. Want to go the extra mile? Pull it into Photoshop and play with it some more (See what I've done below).
Finished colored vector in Illustrator
Finished vector edited in Photoshop. I added a textured layer and offset some of the darker colors to give it that 'vintage print' look.